Showing posts with label wreath. Show all posts

Tuesday, February 6, 2018

How to Host A Romantic Valentine Dinner Party--Part One

Valentine's Day is fast approaching and even though going out to a restaurant is always nice, staying in with friends and loved ones seems a bit more intimate, romantic, and less stressful to the pocketbook.  So follow along with me, as I prepare a Valentine Dinner party for 10.  These lovely people have been so gracious as to have us to their homes in the past few months, so I felt it appropriate to have them.  Consider a small group when planning your event, as conversation, table settings, and food preparation is much easier.

Step One:  Sprucing Up

I started a few weeks before by sprucing up my home.  After I put all the Christmas decorations away, I took my time putting accessories back out.  I wanted to make sure my home was clean and glitter-free before I put things back.  Some of my accessories, especially in the dining room, are silver, so I spent some time polishing trays, etc., before I put them out or before I put them back in storage.

Next on my list was adding something to my urn that sits on a pedestal in the family room.  I had a Christmas arrangement in this, so it has been empty for a few weeks.  I decided that, instead of putting a seasonal arrangement in it, I would create something that would last through the remainder of winter, spring and summer.  So I used artificial white flowers, and a few lavender ones to add a bit of color.


Step Two:  Decor

Mission accomplished.   Next on the list was preparing a welcoming entry.  Most of my friends use my side door which opens directly into the laundry room.  Not exactly the first impression I'm looking for.  I decided on a big Valentine wreath for my front door, and possibly (depending on weather), candles and globes lining the sidewalk to guide my guests to the door and foyer.  We had some yard work done, which included trimming some overgrown bushes and the workers were nice enough to power wash the sidewalk, which had gotten quite nasty over the winter.

I searched Pinterest for inspiration, watched a tutorial, and decided on a ribbon wreath.  I have never done one of these before, but I didn't think it could be so hard.  I had a wreath form, and I got a great deal on ribbon at a local crafts store.   This wreath took a ton of ribbon and a lot of time to do.  I liked the end result, but I'm not sure I would tackle this style again.


The shiny red ribbon was Christmas ribbon and greatly reduced.  I also used tulle--black, white, red, and pink, as well as decorative ribbon with hearts and chevron black and white.  I think I should stick to flowers ...

Then, since I had all this red Christmas ribbon, I decided to make an attempt at something smaller for the side door, just in case.  This didn't take a lot of time (obviously) but at least there's something festive on the door!

It's a bit wind-blown here, since we've been having March-type winds lately.  If I keep doing these, I think I could get it down, but this is definitely beginner level.

As we enter the foyer, I added just a little basket of red and white flowers,  sorta just used what I had leftover.


This silver vase is a an old bride's basket.  It has a handle, which is hard to see in the picture.  

I also worked on the kitchen table, but our dinner will be served in the dining room.  I will use the kitchen table for dessert and snacks.  Stay tuned, as I haven't really decided what I'll put there yet!  Anyway, I decorated some plain column-type vases that you can get at the dollar store with some little red jewel stick-ons.  I also used them on the candles.  They are very inexpensive and you can pick them up at any craft store.


I filled the vase with the wiry heart garland that I found at the grocery store.  The plan is to fill with water and float a candle--which I still need to buy.


I used the same bling on the pillar candles held by my little bored cherub.


There's a backing that just peels off and you can stick it on whatever you'd like.  I think it will come off pretty easily.

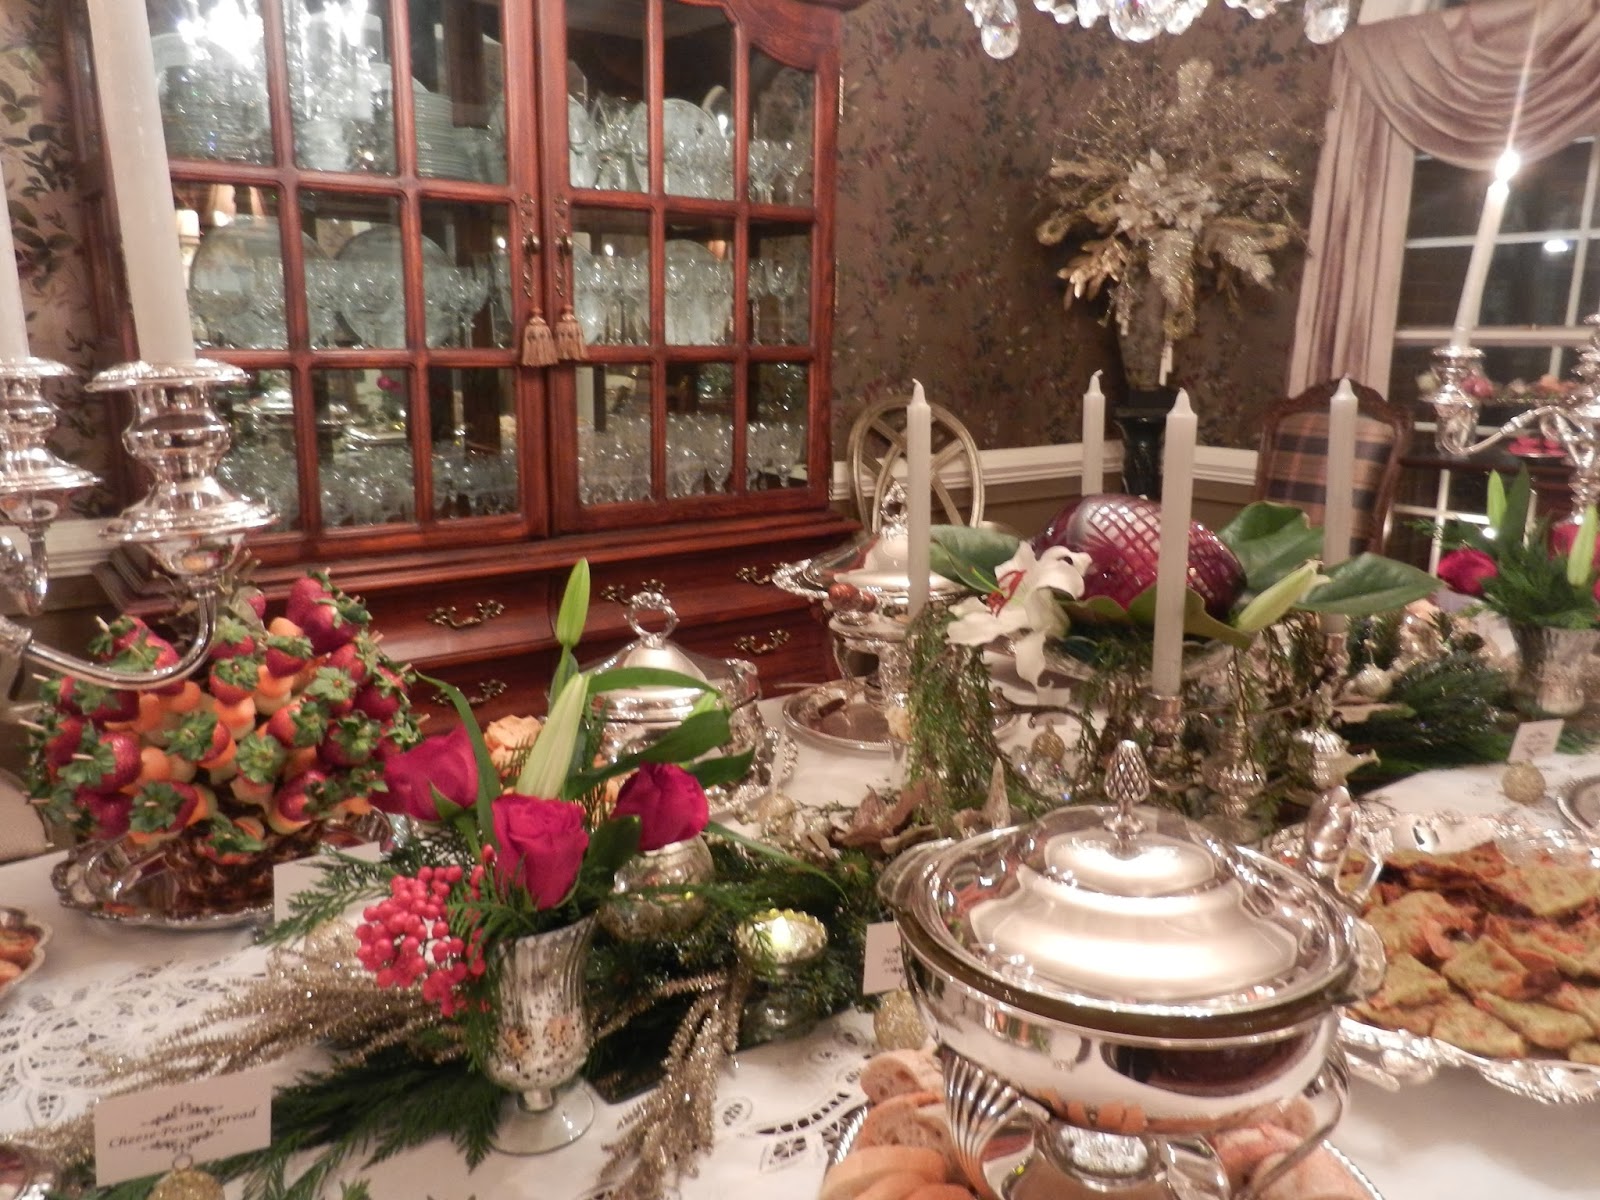
Step three:  Dining Table

Romance is necessary here.  Glamour and cosmopolitan.  That's the look I want.  The only problem is that none of my decor is cosmopolitan, more vintage, I would say.  Black and red was the answer.  And lots of candles.  I used a black tablecloth as my base.  I also used a piece of wood between my table pads and cloth to elevate the center, just a bit.  I bought a piece of craft wood at the hardware store, approx. 12" wide and 48" long.  It's only about 3/4" high.  Didn't take a picture of this step, but I know you can figure it out.  Black tablecloth came next, then mirror tiles down the center.  I am using little battery-powered rice lights on the top of the mirror, then red tulle as a table runner.


You can see the outline of the board in this picture, as well as the lights on the mirror.  I like having things different heights to add interest, but not so much as to block my guests' views.


After adding the tulle, you can see the glimmer of the lights reflecting in the mirror tiles.  I will use red flowers in these vases as well as the centerpiece in the picture above.  The charger plates--two different styles--also reflect light from the chandelier above as well as the shiny hearts I hung from it.

Think I will stop here, as I've got more things to do to get ready, as you can see.  I will finish the table setting, and lastly, prepare the food.  Today I am ironing the napkins and getting all the dishes ready to complete the table.

Thanks for stopping by!  Hope this will give you some ideas as far as entertaining.  I find that not many people do this much anymore.  It's something I enjoy, but if I were invited to someone else's home, I would be just as happy with paper plates!

Hugs,
Betsy


Wednesday, January 8, 2014

No Skimpy Garland

Skimpy garland is not something I'm fond of.  I am also not fond of paying huge amounts of money for nice, thick luxurious looking garland.  So I decided to make my own.  I am aware that most people have moved on, and are thinking of spring, but if I don't record this now, I probably won't get to it or remember to do it next year! 

Start by looking for the fullest, long-needle garland you can find at a reasonable price.  I purchased mine at AC Moore for $19.99 for a 9' piece.  I bought 5 pieces for my outside decorations, 2 for my mantle, and 1 to cut up and use in wreaths and for other decorations. 
Start by opening up the garland and lying it on a flat surface.  I was fortunate that my friend allowed me to work in her interior decorating shop.
Take a cheaper garland, I used some I already had from previous years, and lie it in the center and on top of  the long-needle garland, opening it up and fluffing needles as you go. At this point, I also went ahead and put on white lights.  I used a strand of 100 lights for each 9' piece of garland.  Make sure you test them ahead of time!
I used cable ties to secure the two garlands together.  I secured the garlands underneath the lights, just in case I had to remove the lights--you know how they can be working one minute and out the next.  
These zip ties worked like a charm.  You just put them through, pull them tight, and cut off the excess.  No tying or twisting necessary!
Here is a closeup of the garlands being secured.  The zip ties went under the lights just in case I had light issues.  At this point, you are ready to decorate your garland with your desired decorations.  I don't have pictures of the steps, but I just placed the decorations on first where I thought they looked good, and hot-glued them on.  I used iced holly, iced berries, pine cones, and red birds in nests.  I also used some of the extra garland to make a centerpiece, and tied on a red bow.  Here's how it looked when it was all done!
No skimpy garland!  I also matched the wreath to the decorations on the garland to give it a custom look.  The ribbon on the light fixtures matches the ribbon on the wreath.
On the centerpiece, I added three ornaments that matched the ones on the wreath, a red bow, and pieces of holly.
 The centerpiece is totally separate, I just hooked it on after putting up the garland.
 I also used garland on the rails.
I added berries, holly, and birds to my live trees in the pots, along with white lights.
The wreath is loaded with iced berries, holly, birds, iced branches, pine cones, and red ribbon.  Red shows up well on my wooden door.
I found this little metal deer at an estate sale and brought him home.  I used fresh greenery from my backyard and a faux candle, which came on automatically in the evening thanks to the timer!
The little birds in nests were added after I put the garland up, so I could space them properly.
 I also used three spotlights.
In one of those home catalogs, their garland costs $70.00 for a 9' piece.  I think mine looks just as good, and it was much cheaper!
Hope this helps next year, ha!!

Stay warm, thanks for visiting!

Tuesday, December 31, 2013

Christmas 2013

It seems that a week was lost somewhere... did anyone find it?  I sure didn't, and I haven't had any time to blog or, well anything, really, except get ready for the next day.  From Thanksgiving to December 26th, it has been a whirlwind of activity.  I sorta like that, but it is rather tiring.  I had both my children home, and for that I feel very blessed.  We had a Christmas party--started out as just a small gathering to celebrate the homecoming of my son and daughter--and it grew.  And grew.  So without further ado, I will share with you what I was able to capture.
Again, I used silver for my serving pieces.  A battenburg lace tablecloth is the base, and I used rectangular mirrors down the middle.  This year I used an epergne with greens and a giant ornament as the center.  Mercury glass orbs and vases are added, as well as additional greenery and silver.
I used my candelabras with silver candles.
I added white lillies around the ornament, which sits on top of magnolia and artificial greens
.
Little mercury glass vases hold red roses, berries, and white lillies as well as Christmas greenery.
This year I used my silver reindeer on the server with the desserts.
I used my silver and gold glitzy fruit arrangement on the buffet with mercury glass trees.  I again decorated a small tree, which I placed in a fish bowl in the corner of the room.
This tree was decorated with silver birds, silverplate ornaments I have collected, and various mercury glass ornaments.
In the kitchen, I used feathers, antlers, and magnolia.  The runner and antler candlelabra were purchased at Pottery barn.  I used my vintage serving pieces which are trimmed in gold.
We were still setting up when these pictures were taken, so all the food hadn't been put out at this point.
Sushi and various other snacks were available on the island, along with the wine.  A cranberry martini punch was in the corner in my silver punch bowl.

 I decorated the mantle over the stovetop with garland.
I changed the mantle over the fireplace up a bit, adding bronze and gold-colored poinsettias, gold balls, and gold-colored leaves.  The green garland was a long-needle pine with another garland and white lights added.  I will explain how I did this in a later post.
The girls pose for a picture in front of the mantle.
The wreath above the mantle with my gold reindeer.
Our Christmas tree, ready for Christmas morning.
This is a closeup of the garland on the fireplace.
 I added a new arrangement on the pedestals in the corner, and for fun, a garland around the bust's neck!
I used silhouette angels holding votives on top of the bookcase with a garland, greenery, and feathers.
 Pottery Barn pillows went well in my family room this year.
On top of the wine cabinet, I used mercury glass vases, greenery, a decorated garland, and feathers.
I had my chair upholstered in brown and ivory zebra!
Moving on to the living room, the cocktail table was simply decorated with artificial greenery.
A large sleigh accompanies my angels on the console.
Decorations on the end table include a cherub and a mercury glass candle surrounded by a silver wreath.
Guess I should have started with the foyer, anyway, this is the tree in the foyer and the garland I use on the stairs.
Tree in foyer with the lights on...
A glitzy arrangement sits on the foyer table in a silver wine cooler.  This arrangement can be taken out and stored.  Silver candleholders hold glitzy gold candles (which I don't burn because they are too expensive lol)

Guess that's all for now.  I have lots more Christmas photos to share with you, so stay tuned!!

Thanks for visiting!  Happy New Year!!